


Make an Origami Robotic Finger
Print the robot finger pattern.
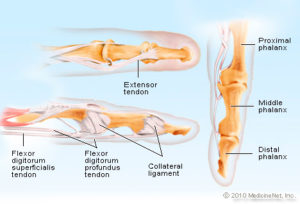
Engineers often observe the human body when creating machines. To create a robotic finger, an engineer would likely first observe her own finger. Try it yourself! Does your finger bend? (Yes! It has joints.) Push on the bottom -- what is pulling on your finger to bend it? (A tendon. Note that your finger does not have a muscle; it has a tendon, which connects the finger bone to muscles in your palm and forearm.) Push on the top -- what is that hard thing? (Your finger bone; finger bones are called "phalanges".) What is wrapped all around it? (Your skin.)
Your robotic finger is similar: it bends at "joints" (bends in the paper); the string acts like a tendon to bend the finger; the foam strip acts like a bone; and the paper is a little like skin! Of course, you don't have a magnet in your finger -- but it would be kind of cool if you did! (Maybe you could glue a magnet to an old pair of gloves to see what that would feel like?) And it's a fascinating fact that your fingertips have more touch receptors than almost any other part of your body! That means they are very useful in feeling and touching things. How might you incorporate that into a robotic finger design?
Want to learn more? Check out this cool origami, battery-free robot that some researchers at Harvard have created!
Materials
- Printed robotic finger form - 1 of this item per student
- Set of markers or similar
- Scissors
- Roll of clear tape
- String - approx 16 inches - 1 of this item per student
- Craft foam (optional) - approx .5 x 12 inches - 1 of this item per student
- Small, strong magnet (such as neodymium) - 1 of this item per student
- Metal paper clips or similar (optional)
Instructions
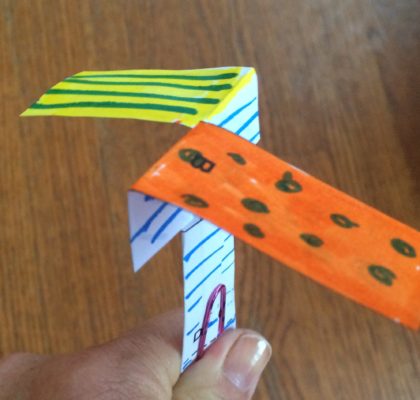
Print out the robot finger pattern. Color as desired.
Cut out along the solid lines. Fold along the dashed lines.
 Tape the top of the 16" string to the inside of the "tip" of the finger (the shortest section).
Fold the sides of the finger together over the string into a box shape and secure with tape. When finished, the string should be sticking out of the bottom.
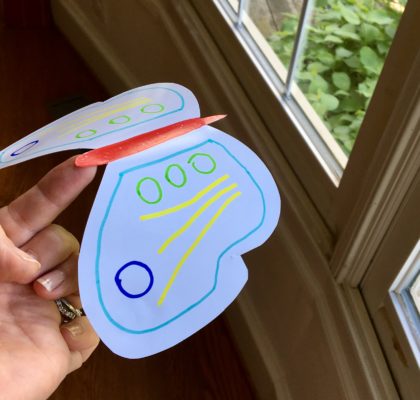
To make the finger more rigid, add a strip of craft foam to the top. This acts a little like a finger bone. If you are going to attach a magnet to the tip, wrap the craft foam around the tip to create a firm location to attach the magnet.
 To give the finger a specific purpose, glue a small neodymium magnet to the tip. (Can find a hardware or craft stores, or purchase on Amazon.com)
Pull on the string to make the finger flex and bend.
Extensions:
- If you've added a magnet, try using it to lift or sort metal objects. Walk around your house to see which metal objects are attracted by the magnet (because not all metal objects are!). If you have another very strong magnet, try moving it in front of the robotic fingertip -- the magnetic force will make the finger move!
- Attach paper clips to foam shapes or cutouts to make a pickup game. Add letters, numbers or words to the objects to add another layer of learning.
- Think about the different tasks your robotic finger might need to do (point, pull objects, open doors, scratch your head, stir liquids, etc.). How might you change the design to perform these different tasks?
- Applying what you've learned, can you create an entire robotic hand?